In this article, we will make a simple Spring Boot project for Product management step by step in which we can create, update, delete and retrieve products. We will use MySQL to store the data.
Step 1: Open Spring initialize (https://start.spring.io/) and create a project by adding the following dependencies:
1. Spring Web
2. MySQL Driver
3. Spring Data JPA
After adding you can change the artifact (changed to ProductBackend) and group name(changed to com.product). After that click on generate, button and a zip file will be downloaded.
Step 2: Extract the zip file and import the project into the IDE (I am using Eclipse IDE).
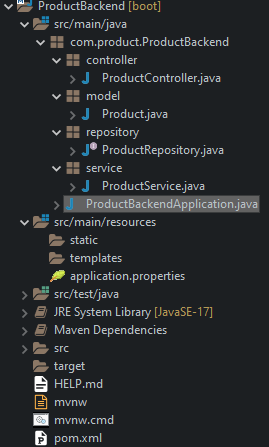
Step 3: After importing the project, create 4 packages in "com.product.ProductBackend" as shown:
Step 4: For connecting the project with the MySQL database, create a database in MySQL.
Creating a database in MySQl:
1. Open MySQL CLI.
2. Enter the password (If you have set a password while installing the MySQL).
3. Write "create database ProductBackend;" in your MySQL CLI and a database with the name, "ProductBackend" will be created in your MySQL.
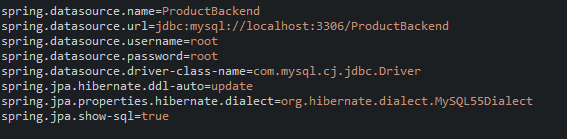
4. Open the application.properties file under "src/main/resources".
add these code in the file:
spring.datasource.name=ProductBackend
spring.datasource.url=jdbc:mysql://localhost:3306/ProductBackend
spring.datasource.username=root
spring.datasource.password=Enter your password here
spring.datasource.driver-class-name=com.mysql.cj.jdbc.Driver
spring.jpa.hibernate.ddl-auto=update
spring.jpa.properties.hibernate.dialect=org.hibernate.dialect.MySQL55Dialect
spring.jpa.show-sql=true
Step 5: Create a class name "Product" under model package and add the following code:
package com.product.ProductBackend.model;
import javax.persistence.Entity;
import javax.persistence.GeneratedValue;
import javax.persistence.GenerationType;
import javax.persistence.Id;
import javax.persistence.Table;
@Entity
@Table(name = "Product")
public class Product {
@Id
@GeneratedValue(strategy = GenerationType.AUTO)
private int id;
private String name;
private int quantity;
private double price;
public Product() {
super();
}
public Product(int id, String name, int quantity, double price) {
super();
this.id = id;
this.name = name;
this.quantity = quantity;
this.price = price;
}
public int getId() {
return id;
}
public void setId(int id) {
this.id = id;
}
public String getName() {
return name;
}
public void setName(String name) {
this.name = name;
}
public int getQuantity() {
return quantity;
}
public void setQuantity(int quantity) {
this.quantity = quantity;
}
public double getPrice() {
return price;
}
public void setPrice(double price) {
this.price = price;
}
}
Step 6: Create a interface name "ProductRepository" under repository package and add the following code:
package com.product.ProductBackend.repository;
import java.util.Optional;
import org.springframework.data.jpa.repository.JpaRepository;
import com.product.ProductBackend.model.Product;
public interface ProductRepository extends JpaRepository<Product, Integer> {
Optional<Product> findByName(String name);
}
Step 7: Create a class "ProductService" under the package service and add the following code:
package com.product.ProductBackend.service;
import java.util.List;
import org.springframework.beans.factory.annotation.Autowired;
import org.springframework.stereotype.Service;
import com.product.ProductBackend.model.Product;
import com.product.ProductBackend.repository.ProductRepository;
@Service
public class ProductService {
@Autowired
private ProductRepository productRepository;
//create product for post method
public Product saveProduct(Product product) {
return productRepository.save(product);
}
//get all product
public List<Product> getProducts(){
return productRepository.findAll();
}
//get product by id
public Product getProductById(int id) {
return productRepository.findById(id).orElse(null);
}
// get product by name
public Product getProductByName(String name) {
return productRepository.findByName(name).orElse(null);
}
//delete the product
public String deleteProduct(int id) {
productRepository.deleteById(id);
return "Product deleted";
}
//update product
public Product updateProduct(int id, Product product) {
Product existingProduct = productRepository.findById(id).orElse(null);
existingProduct.setName(product.getName());
existingProduct.setQuantity(product.getQuantity());
existingProduct.setPrice(product.getPrice());
return productRepository.save(existingProduct);
}
}
Step 8: Create a class "ProductController" under the package "controller" and add the following code:
package com.product.ProductBackend.controller;
import java.util.List;
import org.springframework.beans.factory.annotation.Autowired;
import org.springframework.web.bind.annotation.CrossOrigin;
import org.springframework.web.bind.annotation.DeleteMapping;
import org.springframework.web.bind.annotation.GetMapping;
import org.springframework.web.bind.annotation.PathVariable;
import org.springframework.web.bind.annotation.PostMapping;
import org.springframework.web.bind.annotation.PutMapping;
import org.springframework.web.bind.annotation.RequestBody;
import org.springframework.web.bind.annotation.RequestMapping;
import org.springframework.web.bind.annotation.RestController;
import com.product.ProductBackend.model.Product;
import com.product.ProductBackend.service.ProductService;
@RestController
@RequestMapping("/api/v1/")
public class ProductController {
@Autowired
private ProductService productService;
@PostMapping("/add-products")
public Product addProduct(@RequestBody Product product) {
return productService.saveProduct(product);
}
@GetMapping("/all-products")
public List<Product> findAllProducts(){
return productService.getProducts();
}
@GetMapping("/all-products-byid/{id}")
public Product findProductById(@PathVariable int id) {
return productService.getProductById(id);
}
@GetMapping("/all-products-byname/{name}")
public Product findProductByName(@PathVariable String name) {
return productService.getProductByName(name);
}
@PutMapping("/update/{id}")
public Product updateProduct(@PathVariable int id,@RequestBody Product product) {
return productService.updateProduct(id, product);
}
@DeleteMapping("/delete/{id}")
public String deleteProduct(@PathVariable int id) {
return productService.deleteProduct(id);
}
}
Step 9: Open the "ProductBackendApplication.java" file and run it. Your application will be started on port number 8080.
Step 10: To test the application we will use Postman API (https://www.postman.com/).
First, we add some products using POST request. We have to add the product using JSON format as shown in the given example.
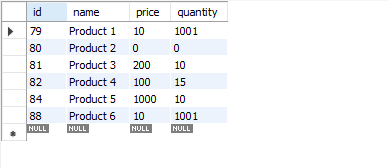
I have added 6 products using the same post request. Lets use GET request to get all the products.
You can also go to MySQL workbench and see the data.
.png)


.png)